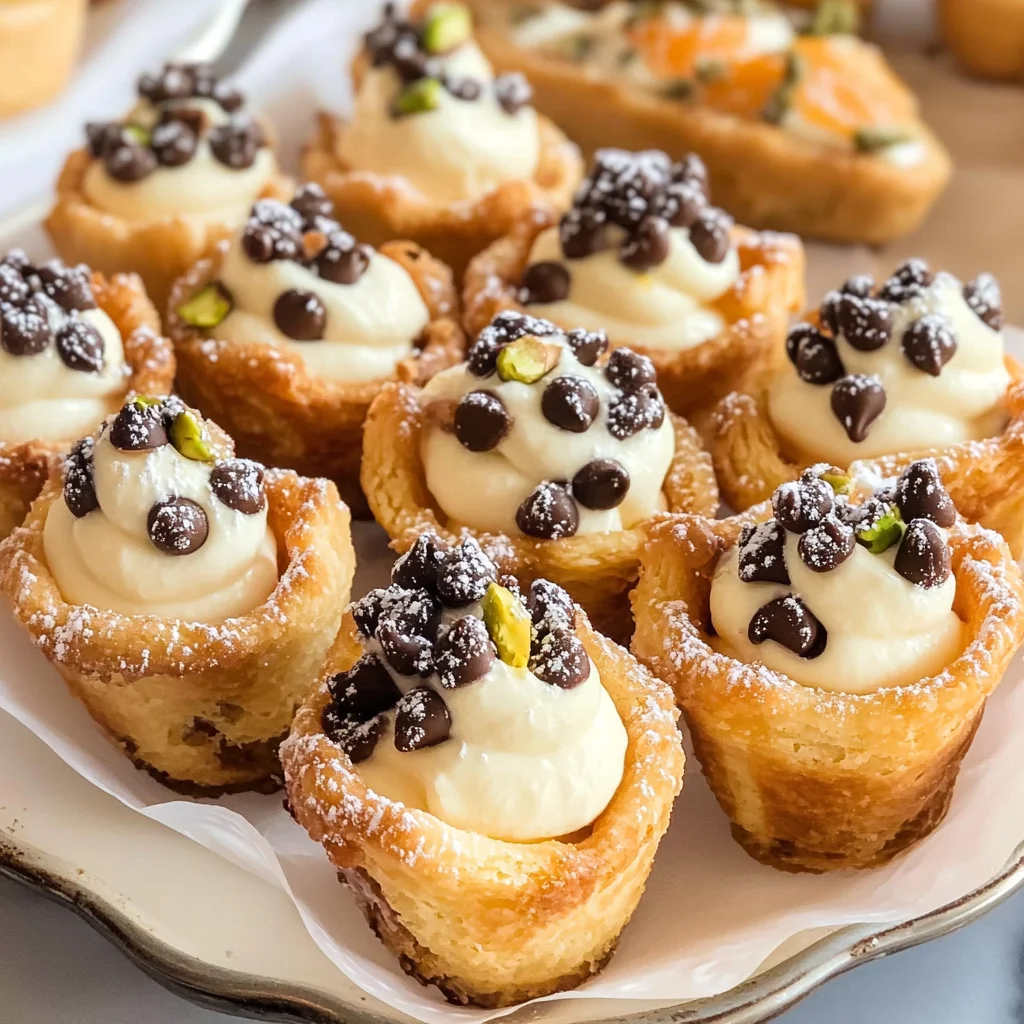
Mini Cannoli Cups
If you’re looking for a delightful dessert that is sure to impress, then you’ve come to the right place! These Mini Cannoli Cups are a fantastic way to bring a touch of Italian sweetness to your table. They are not only easy to make but also bursting with flavor, making them perfect for any occasion—from busy weeknights to family gatherings and celebrations. The best part? Everyone will love them!
These little treats are so versatile; you can whip them up in no time and customize them to suit your friends and family’s tastes. Plus, they look adorable on any dessert spread, making you the star of the show!
Why You’ll Love This Recipe
- Quick Preparation: With just 15 minutes of prep time, these Mini Cannoli Cups fit perfectly into your busy schedule.
- Family-Friendly: Kids and adults alike adore these sweet bites, making them a hit at any gathering.
- Make-Ahead Convenience: Prepare the cups and filling ahead of time for stress-free entertaining.
- Delicious Flavor: The creamy ricotta filling combined with crispy pastry is a match made in dessert heaven.
Ingredients You’ll Need
Let’s gather our simple and wholesome ingredients! You’ll find everything you need at your local grocery store, and I promise it’s all worth it for these delightful Mini Cannoli Cups.
For the Filling
- 1 container whole-milk ricotta cheese (15 oz., drained)
- 1/2 cup powdered sugar
- 2 tablespoons granulated sugar
- 1 teaspoon finely grated orange or lemon zest
- 1/2 teaspoon vanilla extract
For the Cups
- 1 box refrigerated pie crusts, softened as directed on box (2 count)
- 3 tablespoons turbinado sugar (raw sugar)
- 1 teaspoon ground cinnamon
- 1/4 cup miniature semisweet chocolate chips or finely chopped pistachios
- additional powdered sugar
Variations
This recipe is wonderfully flexible! Feel free to get creative and make it your own.
- Mix Up the Zest: Try using lemon or lime zest for a different citrus twist in your filling.
- Change Up the Toppings: Instead of chocolate chips or pistachios, sprinkle with crushed nuts or mini marshmallows for added fun.
- Try Different Flavors: Add a splash of almond extract or some cocoa powder to the filling for a unique flavor profile.
- Go Gluten-Free: Substitute with gluten-free pie crusts if you’re catering to gluten-free friends.
How to Make Mini Cannoli Cups
Step 1: Preheat Your Oven
Preheat your oven to 425°F. This step is key because it ensures that your pastry cups bake evenly and turn golden brown.
Step 2: Prepare the Pastry Cups
Lightly flour your work surface and unroll the pie crusts. Sprinkle turbinado sugar and cinnamon over both crusts—this adds a lovely sweetness! Use a rolling pin gently over the top to press in this mixture. Cut out 2½-inch rounds with a cookie cutter and press each round into ungreased mini muffin cups. You might need to re-roll some dough until you have about 48 circles—don’t worry; it’s all part of the fun!
Step 3: Bake Until Golden
Bake those lovely pastry cups for about 10 minutes or until they are golden brown. Let them cool completely in their pans for about 15 minutes before transferring them onto a wire rack. Cooling is important; it helps keep their shape so they can hold all that delicious filling!
Step 4: Make the Filling
While your cups cool, let’s prepare that luscious filling! In a large mixing bowl, beat together all filling ingredients using an electric mixer on medium speed until creamy. This will take just a few minutes! Once mixed well, transfer it into a zip-top resealable bag, seal it up, and pop it in the fridge until you’re ready to serve.
Step 5: Fill Those Cups
When you’re ready to treat your guests, grab that chilled filling from the fridge. Snip off one corner of the bag and pipe roughly one tablespoon of filling into each cooled pastry cup. Top with mini chocolate chips or chopped pistachios for that finishing touch. A quick dusting of powdered sugar adds an extra flourish!
Step 6: Serve Immediately
Now, gather everyone around and serve these delightful Mini Cannoli Cups right away while they’re fresh. Watch as everyone enjoys these scrumptious little bites—they’re bound to disappear quickly!
Enjoy every delicious moment as you share this favorite recipe with friends and family!
Pro Tips for Making Mini Cannoli Cups
Making Mini Cannoli Cups is a breeze, but these tips will take your dessert to the next level!
-
Use high-quality ricotta: The star of this recipe is the ricotta cheese. Opt for whole-milk ricotta for a creamier and richer filling that will make your cannoli cups unforgettable.
-
Chill the filling: Allowing the filling to chill not only enhances its flavor but also makes piping it into the pastry cups much easier. A well-chilled mixture holds its shape better and prevents any messy overflow.
-
Don’t skip the cooling time: Letting the pastry cups cool completely before filling them is crucial. If you fill warm cups with the ricotta mixture, it can cause the filling to melt and become runny.
-
Experiment with fillings: While this recipe features a classic ricotta filling, feel free to add your twist—try incorporating different extracts or even a hint of cocoa powder for a chocolatey delight!
-
Serve immediately: For the best texture, serve your Mini Cannoli Cups right after filling them. This ensures that the pastry remains crisp, and guests get to enjoy every bite at its freshest.
How to Serve Mini Cannoli Cups
Your Mini Cannoli Cups are not just delicious; they’re also delightful to present! Here are some ideas on how to serve them beautifully at your next gathering.
Garnishes
- Powdered sugar: A light dusting of powdered sugar adds a sweet touch and enhances the visual appeal of each cup.
- Fresh mint leaves: A sprig of mint not only looks beautiful but also adds a refreshing contrast to the rich filling.
- Chocolate drizzle: A quick drizzle of melted chocolate over the top can elevate these treats visually and add an extra layer of flavor.
Side Dishes
- Fresh fruit salad: A vibrant fruit salad made with seasonal fruits offers a refreshing balance to the sweetness of cannoli cups. Consider using berries, melons, and citrus for brightness.
- Coffee or espresso: Pairing these desserts with a robust cup of coffee or espresso complements their richness perfectly. It’s like serving up an Italian café experience right at home!
- Italian biscotti: Crunchy biscotti can be served alongside for added texture. They come in various flavors and make for an enjoyable munch between bites of cannoli cups.
- Gelato: If you’re feeling indulgent, serving mini scoops of gelato alongside these cannoli cups creates a decadent dessert platter that guests will love.
With these tips and serving suggestions, your Mini Cannoli Cups are sure to impress everyone at your next gathering! Enjoy creating this delightful treat that brings smiles all around!

Make Ahead and Storage
These Mini Cannoli Cups are not only delightful but also perfect for meal prep! Whether you’re hosting a gathering or just want a sweet treat on hand, these cups can be prepared ahead of time for maximum convenience.
Storing Leftovers
- Place any leftover Mini Cannoli Cups in an airtight container.
- Store them in the refrigerator for up to 3 days.
- For best taste and texture, consume within this time frame.
Freezing
- To freeze, prepare the pastry cups and allow them to cool completely.
- Store the empty cannoli cups in a freezer-safe bag or container with parchment paper between layers to prevent sticking.
- They can be frozen for up to 2 months.
- Prepare the filling fresh when you’re ready to serve.
Reheating
- If you prefer warm pastry cups, bake them at 350°F for about 5-7 minutes until heated through.
- Avoid reheating filled cups to maintain the texture of the ricotta filling.
FAQs
Here are some common questions you might have about making these delightful Mini Cannoli Cups!
Can I make Mini Cannoli Cups ahead of time?
Yes! You can prepare the pastry cups in advance and store them in an airtight container. Fill them with the ricotta mixture just before serving for optimal freshness.
What are Mini Cannoli Cups made of?
Mini Cannoli Cups are made with a crispy pie crust filled with a creamy ricotta mixture, sweetened with powdered sugar and flavored with citrus zest.
How long do Mini Cannoli Cups last?
When stored properly in the refrigerator, Mini Cannoli Cups will last up to 3 days. For best results, fill them just before serving.
Can I use different fillings for my Mini Cannoli Cups?
Absolutely! Feel free to experiment with different flavors by adding ingredients like cocoa powder, almond extract, or even fresh fruit into your ricotta filling.
Final Thoughts
I hope you’re as excited as I am about these Mini Cannoli Cups! They’re not only easy to make but also incredibly fun and delicious. Perfect for sharing with friends and family—or keeping all to yourself! Enjoy every bite, and I can’t wait for you to try this recipe at home. Happy baking!
Mini Cannoli Cups

Get ready to impress your guests with these delightful Mini Cannoli Cups! These bite-sized treats are a perfect blend of creamy ricotta filling and crispy pastry, making them an irresistible dessert for any occasion. Quick to prepare and easy to customize, these Mini Cannoli Cups are sure to be a hit at family gatherings, parties, or just as a sweet treat for yourself. With only 15 minutes of prep time, you can enjoy the flavors of Italy right in your home!
- Prep Time: 15 minutes
- Cook Time: 10 minutes
- Total Time: 25 minutes
- Yield: Approximately 24 servings 1x
- Category: Dessert
- Method: Baking
- Cuisine: Italian
Ingredients
- 1 container whole-milk ricotta cheese (15 oz., drained)
- 1/2 cup powdered sugar
- 2 tablespoons granulated sugar
- 1 teaspoon finely grated orange or lemon zest
- 1/2 teaspoon vanilla extract
- 1 box refrigerated pie crusts, softened as directed on box (2 count)
- 3 tablespoons turbinado sugar (raw sugar)
- 1 teaspoon ground cinnamon
- 1/4 cup miniature semisweet chocolate chips or finely chopped pistachios
- additional powdered sugar
Instructions
- Preheat oven to 425°F and prepare mini muffin cups.
- Roll out pie crusts; sprinkle with turbinado sugar and cinnamon. Cut into rounds and press into muffin cups.
- Bake for 10 minutes until golden brown. Cool completely.
- In a mixing bowl, combine ricotta cheese, powdered sugar, granulated sugar, zest, and vanilla until creamy.
- Transfer filling to a bag; chill until ready to serve.
- Pipe filling into cooled pastry cups and top with chocolate chips or pistachios.
Nutrition
- Serving Size: 1 cannoli cup (30g)
- Calories: 130
- Sugar: 9g
- Sodium: 50mg
- Fat: 7g
- Saturated Fat: 3g
- Unsaturated Fat: 4g
- Trans Fat: 0g
- Carbohydrates: 15g
- Fiber: 1g
- Protein: 2g
- Cholesterol: 15mg