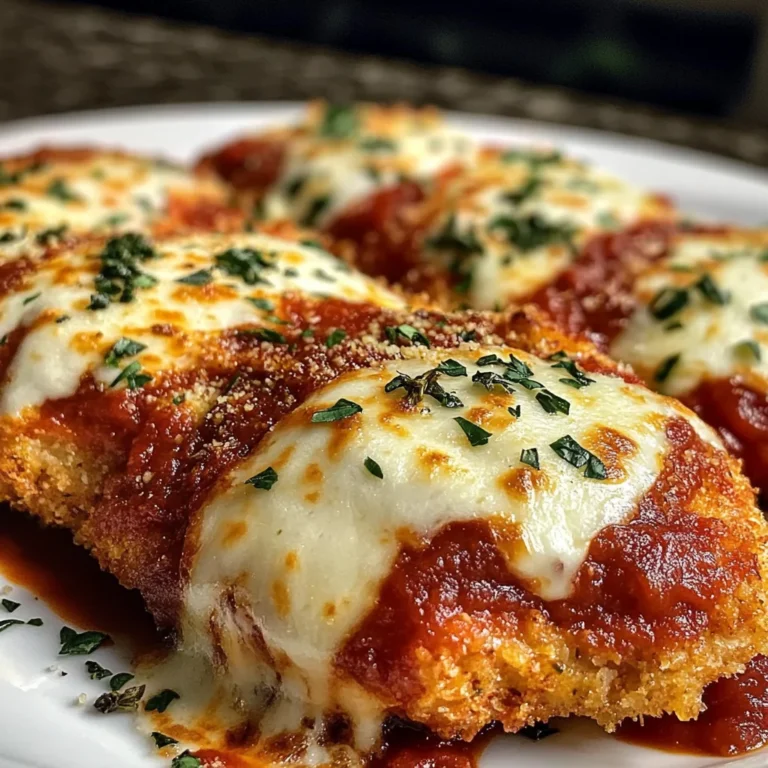
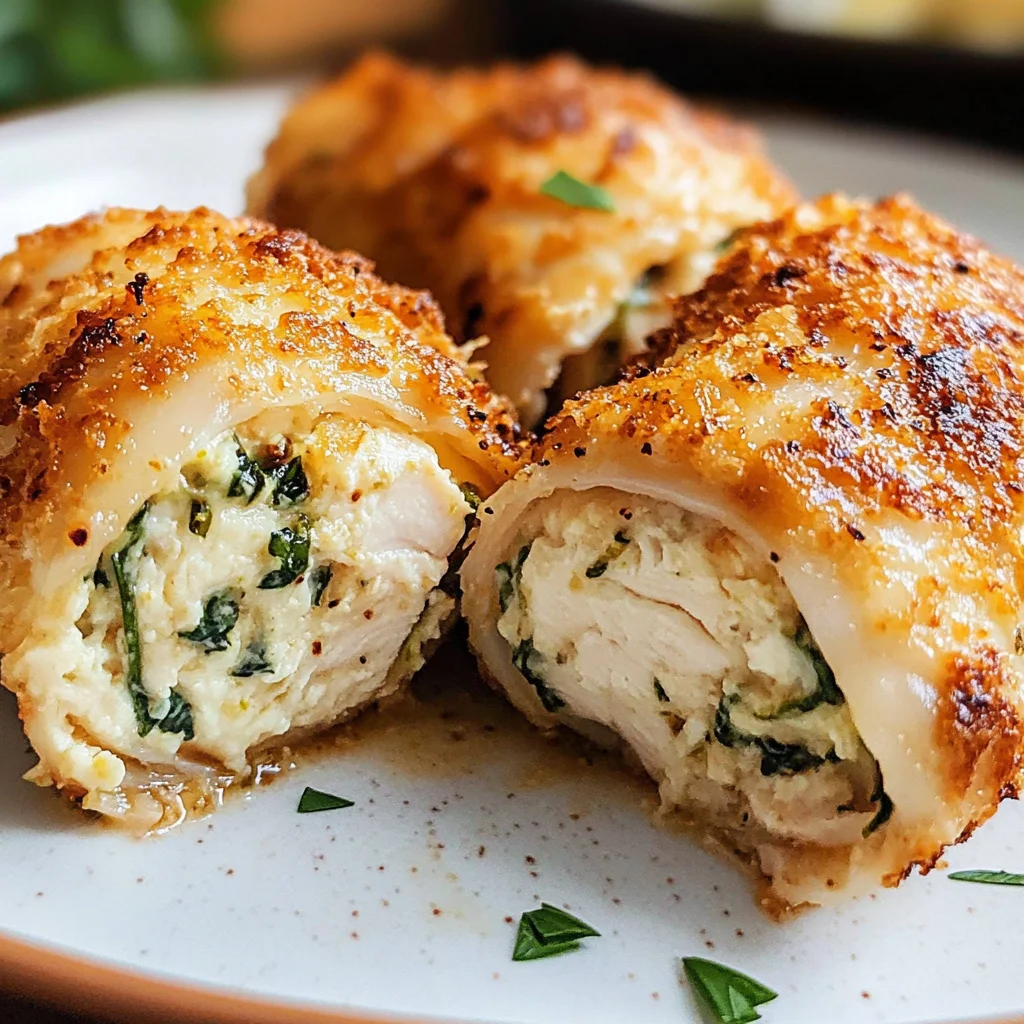
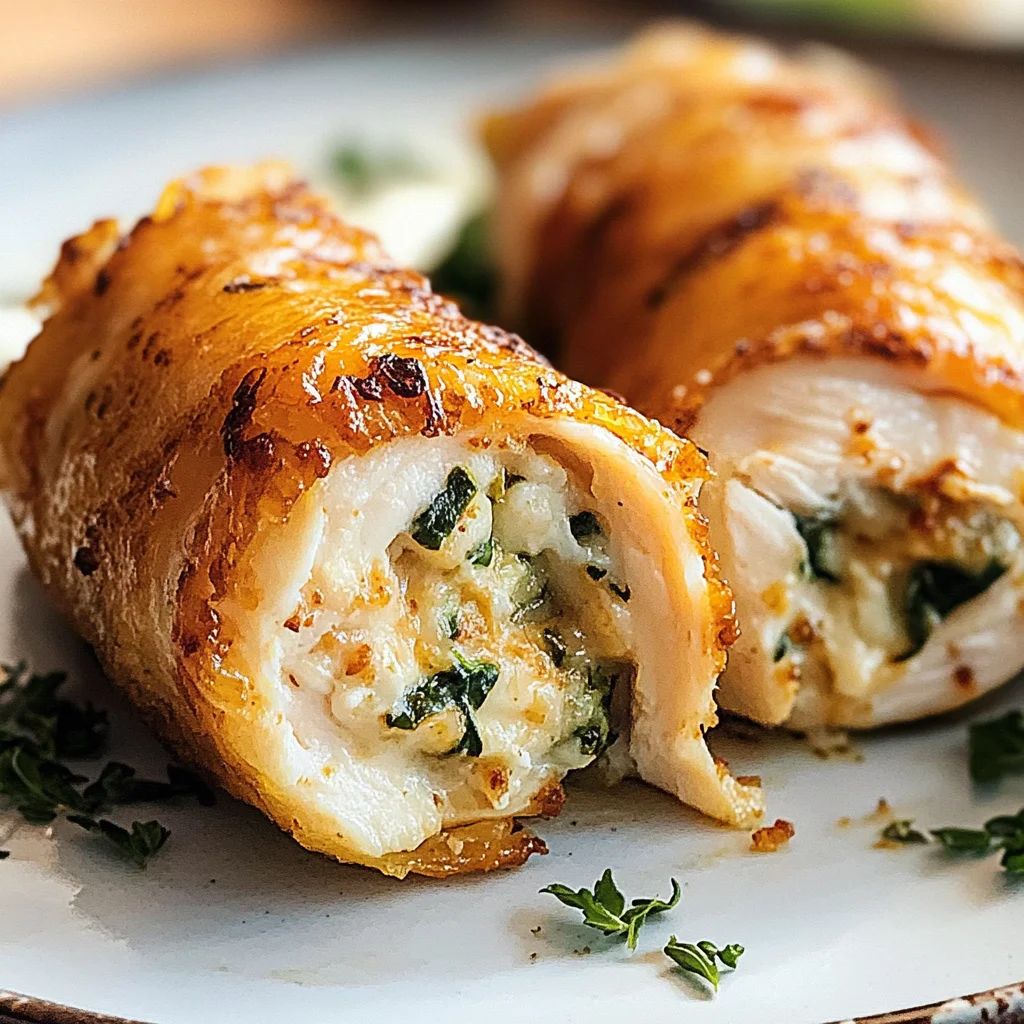
Chicken Roll Ups
If you’re looking for a dish that’s both comforting and impressive, let me introduce you to my beloved Chicken Roll Ups. This recipe combines tender, juicy chicken with a creamy and flavorful filling that will have your family and friends raving. Whether you’re planning a cozy dinner at home or hosting a gathering, these roll ups are sure to be a hit. They’re simple enough for busy weeknights yet elegant enough for special occasions!
What makes this dish even more special is how customizable it is, allowing you to adapt it to your taste or dietary needs. Plus, the aroma wafting from your kitchen while they bake is pure bliss!
Why You’ll Love This Recipe
- Simple preparation: With just a few steps, you can have a delicious meal ready with minimal fuss.
- Family-friendly appeal: Everyone loves cheesy goodness wrapped in tender chicken—it’s a guaranteed crowd-pleaser!
- Make-ahead convenience: You can prepare these roll ups in advance and pop them in the oven when you’re ready to eat.
- Delicious flavor: The combination of cream cheese, mozzarella, and spinach creates a creamy filling that’s bursting with flavor.
Ingredients You’ll Need
Gathering the right ingredients is key to making these Chicken Roll Ups tasty and satisfying. Fortunately, these are simple, wholesome ingredients that you probably already have on hand or can easily find at your local grocery store.
- 4 boneless, skinless chicken breasts
- 1 cup fresh spinach leaves
- 8 oz cream cheese, softened
- 1 cup shredded mozzarella cheese
- 1/2 cup Panko breadcrumbs
- 2 tbsp olive oil
- 1 tsp garlic powder
- Salt and pepper to taste
- 1 cup marinara sauce (for serving)
Variations
One of the best things about Chicken Roll Ups is how flexible this recipe can be! You can easily switch up the ingredients to suit your preferences.
- Swap the protein: Try using turkey or thinly sliced chicken thighs for a different twist.
- Add extra veggies: Incorporate roasted red peppers or mushrooms into the filling for added flavor and nutrition.
- Change the cheese: Substitute the mozzarella with cheddar or feta for a unique taste experience.
- Spice it up: Add some crushed red pepper flakes or chopped jalapeños to the filling if you enjoy a little heat.
How to Make Chicken Roll Ups
Step 1: Preheat Your Oven
Start by preheating your oven to 375°F (190°C). This ensures that your Chicken Roll Ups will bake evenly and get that lovely golden color as they cook. Don’t forget to spray your baking dish with nonstick cooking spray; we want those roll ups to come out easily!
Step 2: Prepare the Filling
In a medium bowl, mix together the softened cream cheese, shredded mozzarella, fresh spinach leaves, garlic powder, salt, and pepper until smooth. This creamy mixture is going to bring so much flavor to our roll ups! It’s important to ensure everything is well combined so every bite is delicious.
Step 3: Flatten the Chicken Breasts
Using a meat mallet or rolling pin, gently flatten each chicken breast until they are about half an inch thick. This helps them cook evenly and makes rolling them up much easier. Plus, thinner chicken means more room for all that tasty filling!
Step 4: Fill and Roll
Spread an even layer of the cheesy filling over each flattened chicken breast. Starting from one end, carefully roll it up tightly. This step is crucial because we want all that amazing filling sealed inside!
Step 5: Coat with Panko
In a shallow dish, mix Panko breadcrumbs with olive oil. Coat each rolled chicken breast in this mixture before placing them seam-side down in your prepared baking dish. The Panko will give them that perfect crispy texture as they bake.
Step 6: Bake Until Golden
Pop those beauties in the oven for about 25-30 minutes until they’re golden brown and cooked through (you want an internal temperature of 165°F). The smell will be incredible—your kitchen will feel like a cozy restaurant!
Step 7: Serve and Enjoy!
Once baked, serve your Chicken Roll Ups hot with marinara sauce drizzled on top or on the side for dipping. These roll ups are not just delicious; they also look beautiful on a plate! Enjoy every bite with family and friends; I promise they’ll be asking for seconds!
Pro Tips for Making Chicken Roll Ups
Making Chicken Roll Ups can be a delightful experience, and with a few simple tips, you can elevate your dish to perfection!
-
Use fresh ingredients: Fresh spinach and high-quality cheese will enhance the flavors and texture of your roll ups, making them more enjoyable for your guests.
-
Flatten chicken evenly: Ensuring that each chicken breast is evenly flattened allows for consistent cooking and easier rolling, preventing any tearing or unevenly cooked pieces.
-
Don’t overstuff: While it might be tempting to add more filling, overstuffing can lead to messy roll ups that may not hold together during baking. Stick to the recommended amount for the best results.
-
Let it rest before slicing: Allowing the roll ups to rest for a few minutes after baking helps the juices redistribute, making each slice more flavorful and tender when served.
-
Experiment with fillings: Feel free to get creative by adding other vegetables or spices to the filling. Ingredients like roasted red peppers or herbs can add an exciting twist to this classic dish.
How to Serve Chicken Roll Ups
Presenting your Chicken Roll Ups beautifully can make your meal even more special. Here are some ideas on how to serve them that will impress your family and friends!
Garnishes
- Fresh basil or parsley: A sprinkle of freshly chopped basil or parsley adds a pop of color and freshness that complements the flavors of the dish.
- Grated Parmesan cheese: A light dusting of grated Parmesan on top before serving can bring an extra layer of flavor and richness.
Side Dishes
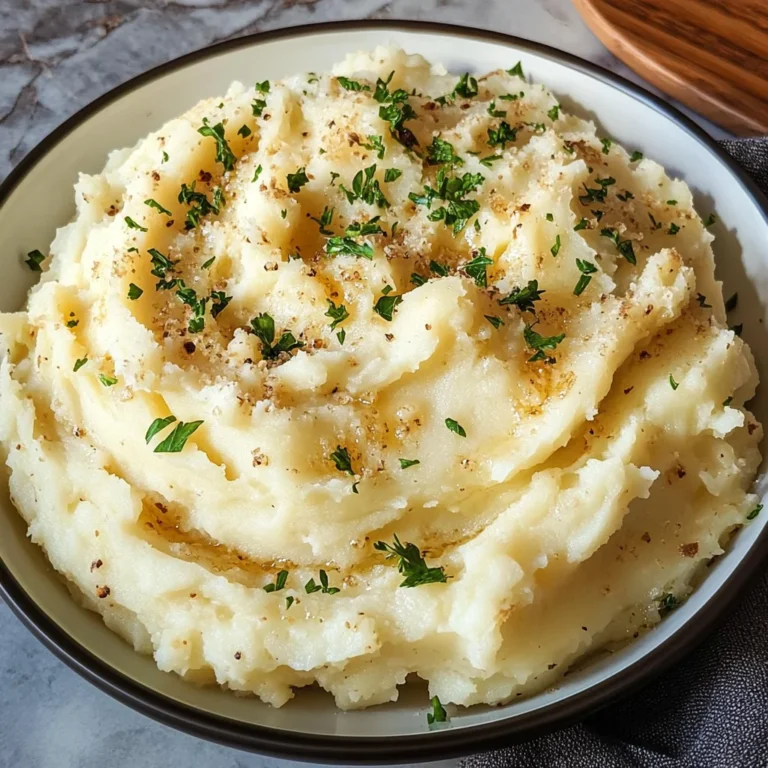
- Garlic mashed potatoes: Creamy mashed potatoes infused with garlic make for a comforting side that pairs wonderfully with the cheesy roll ups.
- Steamed broccoli: Bright green steamed broccoli adds a healthy crunch and vibrant color to your plate without overpowering the flavors of the main dish.
- Mixed greens salad: A simple salad with mixed greens, cherry tomatoes, and a vinaigrette dressing provides a refreshing contrast to the richness of the Chicken Roll Ups.
- Roasted carrots: Sweet roasted carrots add a touch of natural sweetness that balances out the savory flavors in your meal.
By following these tips and serving suggestions, you’re well on your way to creating an unforgettable dining experience with your Chicken Roll Ups! Enjoy every bite!
Make Ahead and Storage
Chicken Roll Ups are perfect for meal prep, allowing you to enjoy a delicious home-cooked meal even on your busiest days. With a few simple steps, you can prepare these roll ups ahead of time and store them for later enjoyment.
Storing Leftovers
- Allow the Chicken Roll Ups to cool completely before storing.
- Place leftovers in an airtight container.
- Store in the refrigerator for up to 3 days.
Freezing
- Wrap individual Chicken Roll Ups tightly in plastic wrap or aluminum foil.
- Place wrapped roll ups in a freezer-safe bag or container.
- Label with the date and freeze for up to 2 months.
Reheating
- For refrigerated roll ups: Preheat your oven to 350°F (175°C). Place the Chicken Roll Ups in a baking dish and heat for about 15-20 minutes or until warmed through.
- For frozen roll ups: Thaw overnight in the refrigerator. Then reheat in the oven as mentioned above, or microwave on medium power until heated through.
FAQs
Here are some common questions you may have about making Chicken Roll Ups.
Can I use other types of cheese for Chicken Roll Ups?
Absolutely! While mozzarella adds a lovely stretchiness, feel free to experiment with other cheeses like cheddar, gouda, or even feta for a unique flavor.
How do I ensure my Chicken Roll Ups turn out tender?
Flattening your chicken breasts evenly is key. This helps them cook uniformly and keeps the roll ups nice and juicy when baked.
What can I serve with Chicken Roll Ups?
These roll ups pair wonderfully with a fresh salad, roasted vegetables, or a side of pasta drizzled with olive oil and garlic.
Can I make Chicken Roll Ups ahead of time?
Yes! You can prepare them in advance and store them in the refrigerator or freezer. They reheat beautifully for busy weeknights!
Final Thoughts
I hope you find joy in preparing these delightful Chicken Roll Ups! They are not only easy to make but also packed with flavor that everyone will love. Whether you’re serving them at a family gathering or enjoying them on a cozy night in, they are sure to be a hit. Enjoy every bite, and don’t hesitate to share your experience with friends and family!
Chicken Roll Ups

If you’re searching for a dish that’s both comforting and impressive, look no further than these Chicken Roll Ups. This recipe features tender chicken breasts rolled around a creamy filling of spinach, cream cheese, and mozzarella, delivering a satisfying meal that’s perfect for busy weeknights or special occasions. The customizable nature of this recipe allows you to tailor it to your preferences, whether by adding extra veggies or switching up the cheese. With a delightful crunch from the Panko coating and a rich marinara sauce for dipping, these roll ups are bound to impress family and friends alike!
- Prep Time: 20 minutes
- Cook Time: 30 minutes
- Total Time: 50 minutes
- Yield: Serves 4
- Category: Main
- Method: Baking
- Cuisine: American
Ingredients
- 4 boneless, skinless chicken breasts
- 1 cup fresh spinach leaves
- 8 oz cream cheese, softened
- 1 cup shredded mozzarella cheese
- 1/2 cup Panko breadcrumbs
- 2 tbsp olive oil
- 1 tsp garlic powder
- Salt and pepper to taste
- 1 cup marinara sauce (for serving)
Instructions
- Preheat the oven to 375°F (190°C) and spray a baking dish with nonstick cooking spray.
- In a bowl, combine softened cream cheese, mozzarella, spinach, garlic powder, salt, and pepper until smooth.
- Flatten each chicken breast to about half an inch thick using a meat mallet or rolling pin.
- Spread the creamy filling over each chicken breast and roll them tightly.
- Mix Panko breadcrumbs with olive oil in a shallow dish and coat each roll before placing seam-side down in the baking dish.
- Bake for 25-30 minutes until golden brown and cooked through at an internal temperature of 165°F.
- Serve hot with marinara sauce drizzled on top or on the side.
Nutrition
- Serving Size: 1 roll up (150g)
- Calories: 314
- Sugar: 2g
- Sodium: 470mg
- Fat: 17g
- Saturated Fat: 8g
- Unsaturated Fat: 9g
- Trans Fat: 0g
- Carbohydrates: 18g
- Fiber: 1g
- Protein: 27g
- Cholesterol: 81mg